Can You Install a Swim Tether Yourself? What to Expect
Yes — and for most setups, it takes 15 to 30 minutes. Every Swim Tether system is designed for DIY installation with basic tools. No plumbing, no electrical, no permits required. What the process looks like depends on your deck material and pool type, so here's a breakdown of each scenario.
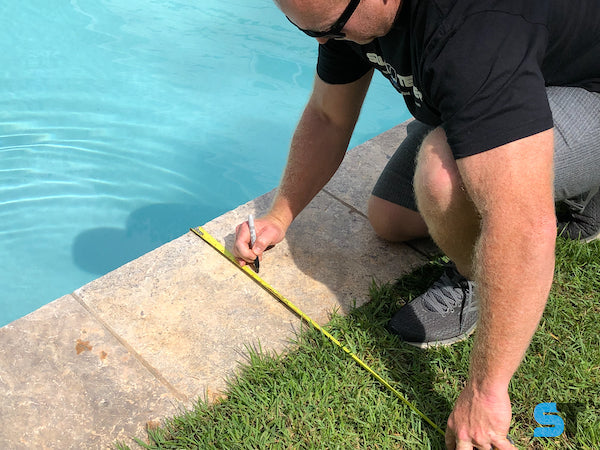
Concrete Deck Installation
The most common installation. The Swim Tether Concrete Deck Base is a 316 stainless steel base that drills into your concrete pool deck and sets with hydraulic cement or construction adhesive. The base sits flush with the deck surface when installed — no protrusions, no trip hazard.
What you need: a hammer drill (corded is recommended), a 1-1/8" masonry drill bit, hydraulic cement or quality construction adhesive, a tape measure, and a pencil. The concrete deck base is included with every Swim Tether kit at no additional cost.
The process: mark your location 6–8 inches from the water's edge (closer to the shallow end is recommended), drill a 3-inch deep hole, clean it out, check the fit, set the base with adhesive, and let it cure for 24 hours before swimming. The main thing to be careful about is confirming your drill location is clear of any rebar, plumbing, or electrical lines beneath the deck — if you're not sure, probe carefully before committing to a location.
Wood or Composite Deck Installation
For wood, composite, or PVC decking, the Threaded Wood Deck Base threads through the deck from above and is secured with a hex nut from underneath. The polished stainless flange sits against the deck surface. Works with decking up to 1.75 inches thick.
What you need: a drill with a 1-1/8" wood boring bit (Forstner or spade), a wrench for the securing nut, a tape measure, and a pencil.
One important check before you drill: make sure you have access to the underside of the deck at your chosen location — no joists, blocking, or obstructions in the way, and enough clearance to get a wrench in to tighten the nut. If you can't reach underneath, choose a different spot. The threaded base doesn't require any curing time — once the nut is tight, the system is ready to use immediately.
Above Ground Pool Installation
Above ground pools use a freestanding installation: a vertical 2" PVC pipe set in a concrete footing in the ground beside the pool. The Swim Tether stainless base presses into the top of the PVC pipe once the concrete cures. Nothing attaches to the pool wall or liner.
This installation takes a bit more effort than the deck options — you'll need a post hole digger or auger, concrete mix, and a level. The PVC pipe should be embedded at least 12 inches below grade, deeper in climates with frost. Once the concrete cures (typically 24–48 hours), the system is solid and ready.
Swim Spa Installation
Swim spa installation is the one scenario where DIY isn't the default recommendation. Drilling directly into the spa shell is not recommended — it can void your spa manufacturer's warranty and risk cracking the acrylic. The right approach depends on your specific spa and its surroundings.
If your spa sits in a surrounding deck, a Swim Tether base can be installed into that deck by your spa dealer or an authorized installer — the same concrete or wood base installation described above, just positioned at the spa's edge rather than a pool deck.
If you own an Arctic Spa, there's a completely tool-free option: the Arctic Spa Adapter threads directly into the built-in accessory port on the spa's top rail. Hand-tighten only, no modification required, no warranty impact. It's the cleanest swim spa installation available.
For other swim spa brands, contact your dealer before attempting any installation. Some manufacturers offer factory-installed Swim Tether bases as a dealer option — worth asking about when purchasing a new spa.
Travel Belt: No Installation at All
If you're not ready for a permanent installation, or you need a solution for travel, the Swim Tether Travel Belt skips installation entirely. A non-slip anchor strap wraps around any fixed object at the pool — a handrail, ladder rail, or post — and locks in place under tension. The swim belt connects to the anchor via an 8-foot stretch cord. The whole thing sets up in under a minute and packs into a bag.
How Long Does Installation Actually Take?
Concrete deck: about 20–30 minutes of active work, plus 24 hours of curing time before use. Wood deck: 15–20 minutes, ready to use immediately. Above ground pool: 30–45 minutes of active work plus concrete cure time. Arctic Spa Adapter: under 5 minutes. Travel Belt: under 1 minute.
If you run into any questions during your installation, the team is available by text at 770-702-4558 or email at shop@swimtether.com. Step-by-step instructions with photos for every installation type are also available on the installation guide page.
Not sure which system is right for your pool? Build your kit here.
Share:
Swim Tether ST3 vs. ST2 vs. ST1: Which Model Is Right for You?
Swim Spa vs. Lap Pool: Which Is Better for Tethered Swimming Training?